#webpack
Review
- 2020/08/03
- 2021/02/27
Core Concepts:
- Entry
- Output
- Loaders
- Plugins
- Mode
- Browser Compatibility
- Modules — files
- Chunks — includes one or more modules, each chunk will have a corresponding file in the dist directory.
- Assets
- Shims
一、Quick Start #
Installation
npx webpack init

# Or
npm install webpack webpack-cli --save-dev
Configuration
const path = require('path');

module.exports = {
  entry: './src/index.js',
  output: {
    path: path.resolve(__dirname, 'dist'),
    filename: 'bundle.js',
  },
};
Webpack 本质上是一个函数,它接受一个配置信息作为参数,执行后返回一个
compiler 对象,调用 compiler 对象中的
run 方法就会启动编译。run 方法接受一个回调,可以用来查看编译过程中的错误信息或编译信息。
// build.js
const { webpack } = require("webpack");
const webpackOptions = require("./webpack.config.js");
const compiler = webpack(webpackOptions);

//开始编译
compiler.run((err, stats) => {
  console.log(err);
  console.log(
    stats.toJson({
      assets: true, //打印本次编译产出的资源
      chunks: true, //打印本次编译产出的代码块
      modules: true, //打印本次编译产出的模块
    })
  );
});
执行 node build.js,产出 dist/main.js ,内容如下:
(() => {
  var __webpack_modules__ = {
    "./src/age.js": (module) => {
      module.exports = "agevalue";
    },
    "./src/name.js": (module) => {
      module.exports = "namevalue";
    },
  };

  // The module cache
  var __webpack_module_cache__ = {};

  // The require function
  function __webpack_require__(moduleId) {
    // Check if module is in cache
    var cachedModule = __webpack_module_cache__[moduleId];
    if (cachedModule !== undefined) {
      return cachedModule.exports;
    }
    // Create a new module (and put it into the cache)
    var module = (__webpack_module_cache__[moduleId] = {
      exports: {},
    });

    // Execute the module function
    __webpack_modules__[moduleId](module, module.exports, __webpack_require__);

    // Return the exports of the module
    return module.exports;
  }

  var __webpack_exports__ = {};
  (() => {
    const name = __webpack_require__("./src/name.js");
    const age = __webpack_require__("./src/age.js");
    console.log("test", name, age);
  })();
})();
二、核心思想 #
- 首先,根据配置信息(
webpack.config.js)找到入口文件(src/index.js) - 找到入口文件所依赖的模块,并收集关键信息:比如
路径、源代码、它所依赖的模块等 - 根据上一步得到的信息,生成最终输出到硬盘中的文件(dist): 包括 modules 对象、require 模版代码、入口执行文件等
在这过程中,由于浏览器并不认识除 html、js、css 以外的文件格式,所以我们还需要对源文件进行转换 —— Loader 系统。
- Loader 系统: loader 是一个转换器,将 A 文件进行编译输出 B 文件,比如:将 A.less 转换为 A.css,单纯的文件转换过程。webpack 自身只支持 js 和 json 这两种格式的文件,对于其他文件需要通过 loader 将其转换为 commonJS 规范的文件后,webpack 才能解析到。
- Plugin 系统:plugin 是一个扩展器,它丰富了 webpack 本身,针对的是 loader 结束后,webpack 打包的整个过程,它并不直接操作文件,而是基于事件流机制工作,会监听 webpack 打包过程中的某些节点(类似生命周期),执行广泛的任务。
While loaders are used to transform certain types of modules, plugins can be leveraged to perform a wider range of tasks like bundle optimization, asset management and injection of environment variables.
Plugin #
创建Plugin的标准方式
class CustomPlugin {
  apply(compiler) {
    compiler.hooks.someHook.tap('CustomPlugin', values => {
      // ...
    });
  }
};
Modules #
Webpack中的 module 是跟文件相关联的,简单理解,module 就是文件的升级版本。
A module is an upgraded version of a file. A module, once created and built, contains a lot of meaningful information besides the raw source code, such as: the loaders used, its dependencies, its exports(if any), its hash and much more. Each item in the
entryobject can be thought of as the root module in a tree of modules. All these module trees are stored together in aModuleGraph一个 module,一旦创建和构建,除了原始源代码之外,还包含许多有意义的信息,例如:使用的loaders、它的依赖项、它的导出(如果有的话)、它的哈希等等。 entry 对象中的每一项都可以被认为是 module trees 中的 root module。
Modules includes:
- NormalModules(Simply as modules)
- ExternalModule: When using module federation (模块联邦)
- ConcatenatedModule: When using require.context()
三、架构设计 #
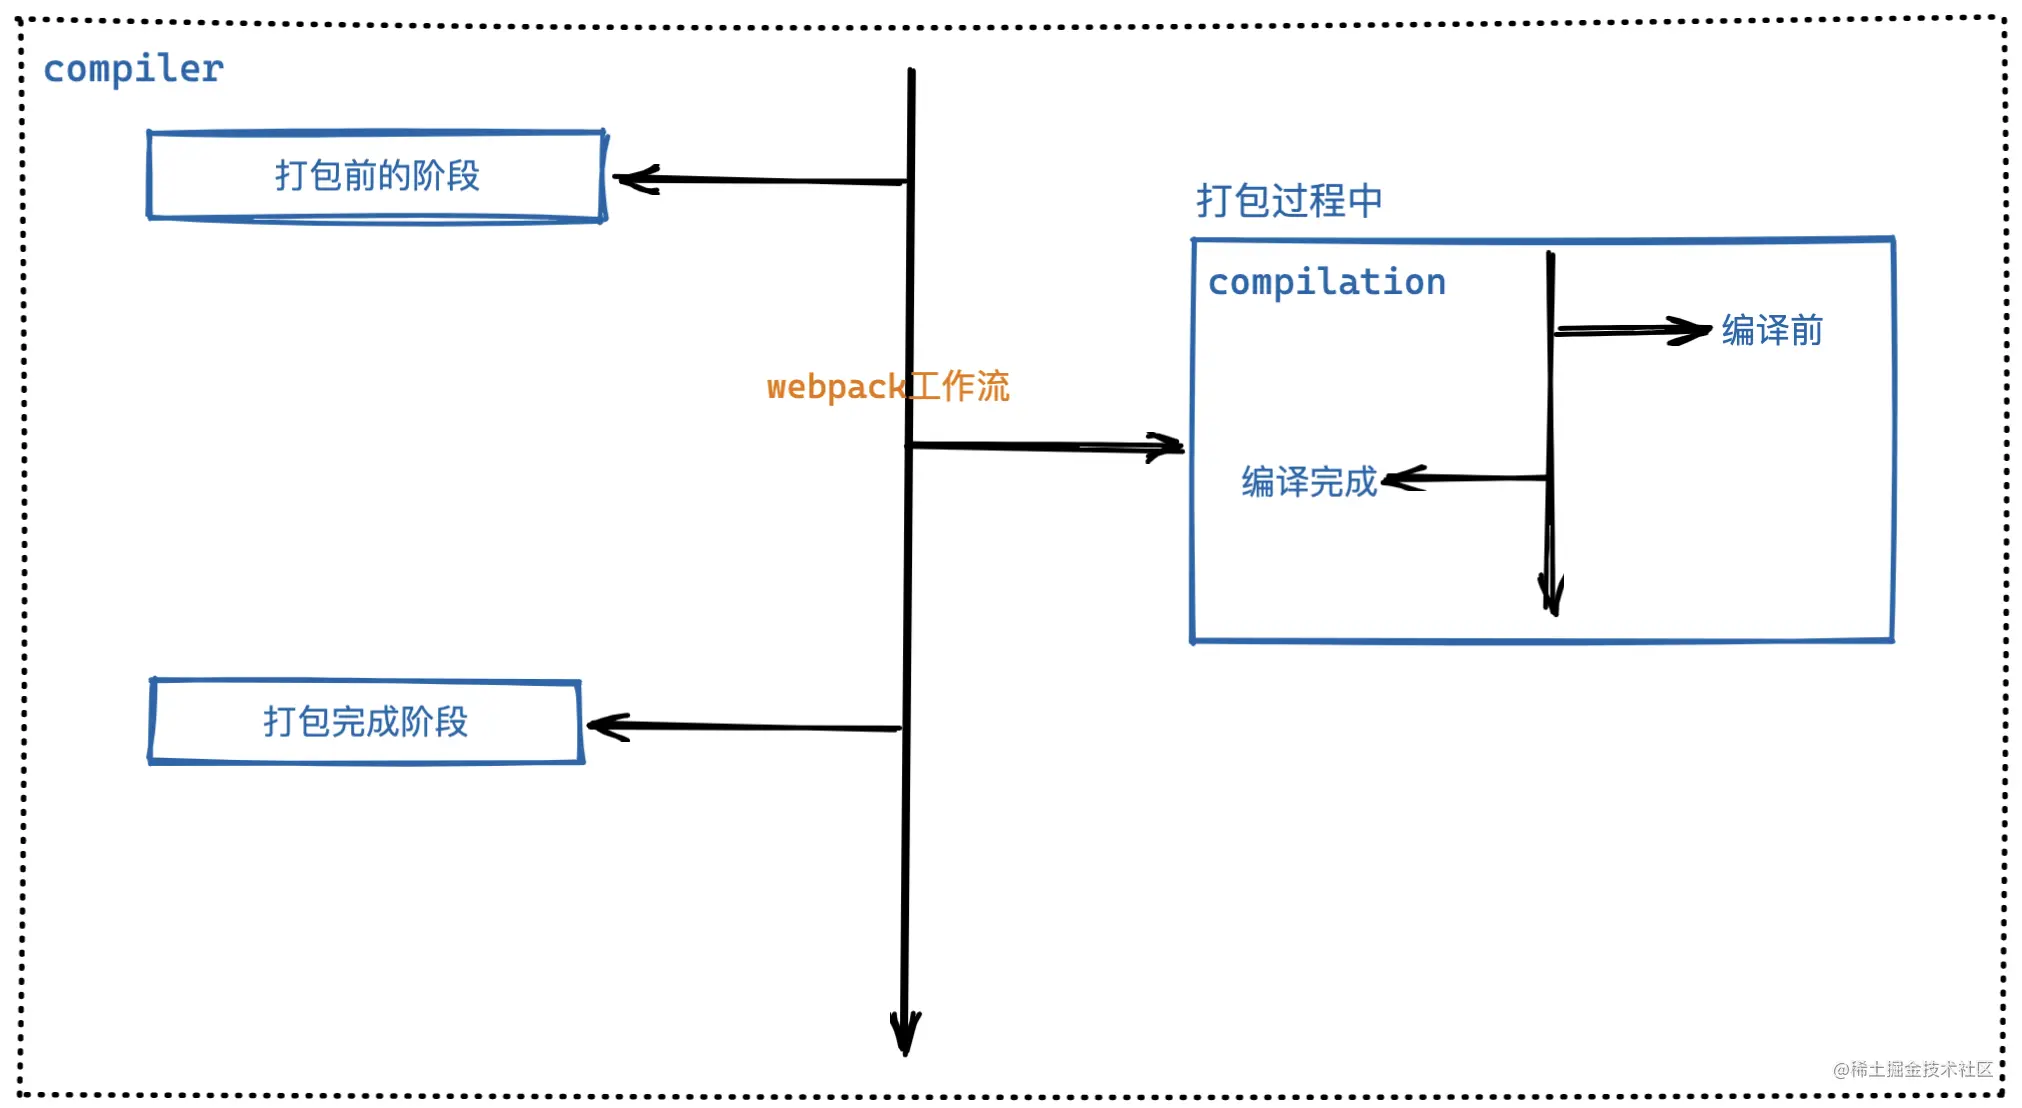
整个打包过程,大致可以分为三个阶段:
- 打包开始前的准备工作
- 打包过程中(也就是编译阶段)
- 打包结束后(包含打包成功和打包失败)
在 Webpack 源码中,compiler 就像是一个大管家,它代表上面说的三个阶段,在它上面挂载着各种生命周期函数,而 compilation 就像专管伙食的厨师,专门负责编译相关的工作,也就是打包过程中这个阶段。
Webpack的可扩展性是通过 hooks 实现的。 事件流的实现是基于 Tapable
Tapable #
它是一个类似于 Node.js 中的 EventEmitter 的库,但更专注于自定义事件的触发和处理。通过 Tapable 可以注册自定义事件,然后在适当的时机去执行自定义事件。
const {
	SyncHook,
	SyncBailHook,
	SyncWaterfallHook,
	SyncLoopHook,
	AsyncParallelHook,
	AsyncParallelBailHook,
	AsyncSeriesHook,
	AsyncSeriesBailHook,
	AsyncSeriesWaterfallHook
} = require("tapable");
const { SyncHook } = require("tapable"); //这是一个同步钩子
//第一步:实例化钩子函数,可以在这里定义形参
const syncHook = new SyncHook(["author", "age"]);
//第二步:注册事件1
syncHook.tap("监听器1", (name, age) => {
console.log("监听器1:", name, age);
});
//第二步:注册事件2
syncHook.tap("监听器2", (name) => {
console.log("监听器2", name);
});
//第二步:注册事件3
syncHook.tap("监听器3", (name) => {
console.log("监听器3", name);
});
//第三步:触发事件,这里传的是实参,会被每一个注册函数接收到
syncHook.call("不要秃头啊", "99");Hook types
Basic hook
Waterfall
Bail
Loop
Sync
AsyncSeries
AsyncParallel
Interception
- call
- tap
- loop
- register
Tap method
- tap
- tapAsync
- tapPromise
Webpack钩子 Compiler部分重要钩子
- environment
- entryOption
- beforeRun
- run
- watchRun
- shouldEmit
- emit
- afterEmit
- done
- log
Compilation部分重要钩子
- buildModule
- optimise
- record
四、具体实现 #
大致步骤
- 搭建结构,读取配置参数
- 用配置参数对象初始化
Compiler对象 - 挂载配置文件中的插件
- 执行
Compiler对象的run方法开始执行编译 - 根据配置文件中的
entry配置项找到所有的入口 - 从入口文件出发,调用配置的
loader规则,对各模块进行编译 - 找出此模块所依赖的模块,再对依赖模块进行编译
- 等所有模块都编译完成后,根据模块之间的依赖关系,组装代码块
chunk - 把各个代码块
chunk转换成一个一个文件加入到输出列表 - 确定好输出内容之后,根据配置的输出路径和文件名,将文件内容写入到文件系统
Reference #
- Webpack Concepts: https://webpack.js.org/concepts/
- Webpack系列(上): https://mp.weixin.qq.com/s?__biz=MzAxODE2MjM1MA==&mid=2651557989&idx=1&sn=74f22c5c721345a6dfc77e1c1b34ab92
- Webpack系列(中): https://mp.weixin.qq.com/s?__biz=MzAxODE2MjM1MA==&mid=2651558008&idx=1&sn=447afddf7298c3a5c227c9fe80eeda64
- Webpack系列(下): https://mp.weixin.qq.com/s?__biz=MzAxODE2MjM1MA==&mid=2651558041&idx=1&sn=ace886c5c317dd19930d441a273cfb7d
- webpack插件原理分析: https://mp.weixin.qq.com/s?__biz=MzAxODE2MjM1MA==&mid=2651566366&idx=2&sn=d87ea140ece97f4f3d3adf7af8ed1f29
- Tapable: https://github.com/webpack/tapable
- 二十张图片彻底讲明白Webpack设计理念,以看懂为目的